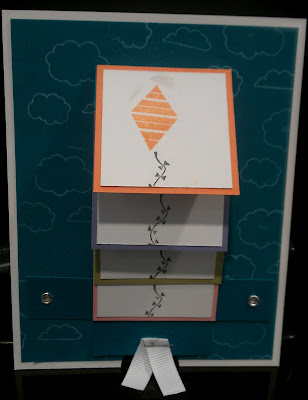
Monday, March 5, 2012

Bunny Basket


SUPPLIES:
· Stamps – none
· Card Stock – Whisper White, Blushing Bride
· Ink – Basic Black, Basic Gray, White Gel Pen, Basic Black Marker
· Accessories – Certainly Celery Ribbon, Sponge
· Tools – Big Shot, Top Note die, Scallop Square Die, Wide Oval Punch, Large Oval Punch, 1 ¼” Circle Punch, 1” Circle Punch, ½” Circle Punch, Heart to Heart Punch
INSTRUCTIONS:
Use the wide oval punch for the outer ear and feet and the large oval punch for the inside of the ear. Use the Circle Punches for the toes and feet pads and the small heart punch (turned upside down) for the nose. Cut scraps of white thin strips for whiskers. Sponge ears, feet and cheeks with Basic Gray ink. Use the Basic Black marker for the dots on the cheeks and the white gel pen for the eyes. Cut a strip of Blushing Bride cardstock for the handle.


Tea Shoppe Tea Bag Holder


This would be great for a gift topper or to accompany a package of tissues and chicken noodle soup for a sick friend!
SUPPLIES:
· Stamps – Tea Shoppe (from new mini catalog)
· Card Stock – Pool Party, Poppy Parade, Pear Pizzazz, Very Vanilla, Everyday Enchantment DSP (from new mini catalog)
· Ink – Poppy Parade, Chocolate Chip
· Accessories – Chantilly Ribbon, Tiny Pearls, Tea Bag, Dimensionals
· Tools – Stapler, Scallop Border Punch, Mat Pack, Itty Bitty Shapes Punches


Heaven Blessed Cracked Glass Card

SUPPLIES:
· Stamps – Heaven Blessed (from new mini catalog)
· Card Stock – Pear Pizzazz, Wisteria Wonder, Whisper White
· Ink – Versamark, Chalks
· Accessories – Clear Embossing Powder, Whisper White Taffeta Ribbon
· Tools – Big Shot, Top Note Die, Polka Dot Textures Die, Heat Gun, Powder Pals Tray, 2 ½ Inch Circle Punch

INSTRUCTIONS:Cover the stamped image thoroughly with VersaMark ink. Sprinkle a heavy layer of Stampin' Up!'s Glassy Glaze Enamel or Clear Embossing Powder over VersaMark. TIP: The Powder Pals make it easy to return the excess back to the container for reuse. Heat Emboss with a Heat Tool. Allow to cool completely. REPEAT Versamark and Heat Emboss with Glassy Glaze or Clear Embossing Powder three more times. The goal is to build up a thick layer that can be cracked. After cool (TIP: I tossed mine in the freezer for a few minutes), bend panel to create cracked "glass" lines where you want them.

Send Me Soaring Waterfall Card


SUPPLIES:
· Stamps – Send Me Soaring (from the new mini catalog)
· Card Stock – Whisper White, Island Indigo, Pool Party, Lucky Limeade, Calypso Coral, Wisteria Wonder
· Ink – Basic Black, Island Indigo, Pool Party, Lucky Limeade, Calypso Coral, Wisteria Wonder, Craft White
· Accessories – Whisper White Grossgrain Ribbon, Eyelets
· Tools – Crop-A-Dile, 1” Circle Punch, Stapler


INSTRUCTIONS:

Cut your Neutral Cardstock in the following measurements: 5¼" x 8" (1), 1 7/8" x 1 7/8" (4).Cut your Colored Cardstock in the following measurements: 2" x 2" (4), 5½" x 4¼" (1), 9" x 2" (1), ¾" x 4" (1). Stamp the largest piece of cardstock and also the four neutral-colored squares. Attach your stamped squares to the slightly larger colored cardstock squares with your adhesive. Score your 9 x 2 strip of colored cardstock. Starting at end of strip, score 2", 2¾", 3 ½", and 4 ¼" from the end. Attach the horizontal strip (the one which measures ¾" x 4") to front of card with eyelets. Note: it is very important that you do not use any adhesive in the middle of this piece! Next, attach the scored 9X2 scored strip to the horizontal strip you just attached to the card front. To do this, slide the longest section of the 9X2 scroed strip between the horizontal strip and the card, making sure to center it in the middle of your card. Line up the very edge of the scored end of the 9X2 scored strip with bottom of the horizontal strip and attach with adhesive. Attach your first stamped image to the bottom 2" x 2" space at the scored end of the 9X2 scored strip. Apply adhesive to the scored sections of the 9X2 scored strip only, and attach remaining stamped pieces. Once you've attached these pieces, you should be able to gently pull the bottom of the longest section of the 9X2 scored strip directly down and watch the stamped images flip one at a time and then slide behind the 9X2 scored strip. Attach eyelet and ribbon to the bottom of the 9X2 scored strip. To do this, simply mark where you want to place your eyelet with card in the closed position. Then pull the longest section of the 9X2 scored strip until it is fully extended. Punch a hole and place eyelet. Thread ribbon through eyelet and tie. Trim ends with scissors.
Related Posts Plugin for WordPress, Blogger...